Homemade The workshop, how to make your own BDSM toys

Doctor Pervert

Retired
  • Straight
  • Male
  • Private
May 19, 2013
3,508
4,835
483
This is something I've been planning to do for a long time, a series of how to's on making your own BDSM toys.
But I don't want to limit this thread to myself, feel free to join in the conversation and ask question, share suggestions and please add any ideas or techniques for things you may have made yourself.

To kick things off I want to dispel the idea that making these kind of toys is beyond most people, it's not. The tools and skills needed are quite basic, if you don't have the tools I'm going to show you what you need to have, if you don't have the hand skills then I will show you simple, easy to learn techniques and hacks to get your own toy building underway. Most things will be cheap to make and I will show you the hacks to use cheap tools if you need to buy them or improvisations to get things done.

The best way to learn is to do, so I'm going to start the series off with a very simple tit press that I call the "Tit cracker", simply because it is reminiscent of the traditional nut cracker. Over the coming days I'm going to run through the design, the materials needed, the tools needed and then progress on to making it. This will teach most of the basics for a lot of simple toys as well as building the skills and confidence to tackle bigger and more complicated projects.

Please don't be shy, there are no dumb questions here, if something doesn't make sense yell out. I will be providing design drawings and showing you how to read them as well as step by step photos of the various projects.

I'm hoping to have the first installment or two of the Tit Cracker project up over the course of the next day so look out for them.
 

Doctor Pervert

Retired
  • Straight
  • Male
  • Private
May 19, 2013
3,508
4,835
483
Project One, The Tit Cracker.

Just before we get started here's a few things about my tutorials, my dimensions will always be in millimetres, don't be put off by this if you are in the US. Most rulers and tape measures will have these markings too and when it gets to the nitty gritty of buying stuff I will pop in old school inches in brackets.
Also look out for the bright yellow "hacks", these are tips that will let you jump ahead and make the project easier and quicker.

So lets jump right in then and have a look at this nice, simple BDSM toy.

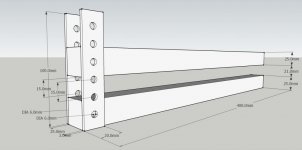
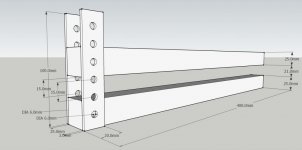
tit cracker dimensions.jpg

If you click on the thumbnail you'll get a full size view of the design. This kind of drawing is a dimensioned perspective view, and for most people it's much easier to read than the more tradition 2D plan and elevation style drawings.
Now ok, maybe it looks way too complicated first up but I'm now going to break it down so you know how to read all those cryptic looking numbers and lines.

The dimensions are simply the sizes of the pieces of material being used. For this project it is really simple being composed of two identical wooden bars running horizontally, and two identical metal plates running vertically. We will be adding bolts in later to hold it together but for now I left them out to simplify the drawing.
Each dimension has a number between two lines with arrow tips, these arrows point to the guide lines showing you what the dimension is measuring.
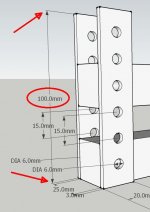
For instance the metal plates are 100mm long, the red arrows point out the ends of the lines indicating the top and bottom of the back plate.

TC dim 1.jpg

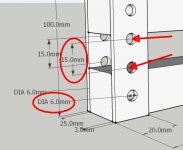
Ok that's pretty easy but what about the ones that say DIA? Well they're simply the diameter of the holes in the plates. This is the size of the drill bit you will need to make these holes but more on that later.
You'll also notice there are dimensions that point to the middles of the holes, these indicate how far apart the holes need to be, this is usually referred to as spacing. In this project the spacing is same for all the holes, they are 15mm apart.

DC dim 2.jpg


At this point if you're going "ok I think I get that, but I don't have the tools or the talent to make this!" fear not.

A lot of what I've shown you here you can actually buy from the hardware pre-made with hard bits done for you.

The wooden bars are simply 25mm x 25mm (1")softwood, pine is ideal, cut to 400mm (about 16") in length. Most major hardware stores will have a "chop shop" where they will, for a few bucks, cut your timber to length. But if you have a saw (or want to own one) you can easily cut these yourself.

The metal plates can be purchased in various lengths pre-drilled at the same large hardware store. You will find a bewildering range of styles, thicknesses and types of these with names like Instabracket, Make-A-Bracket and many others.

And this bring me to the final part of this installment, you don't need to find something that is exactly these dimension, just something close enough.
If you find you have some old garden stakes at home that are 20mm x 20mm (3/4") that will work, if you see something that is 30mm x 30mm (1-1/4")that will also do. Same thing goes for the plates, if you find something with holes spaced 12mm (1/2") apart thats fine and if those holes are only 5mm (3/16") that'll work too. Of course if you are competent at drilling metal then by all means make the plates yourself.

Now I know you may be keen but don't rush out to buy anything just yet as there are more materials needed as well as a few steps where you will need tools so hold out for part two and meantime if you have a question or three post it here.
 
Last edited:
  • Like
Reactions: BamaSwitch

Doctor Pervert

Retired
  • Straight
  • Male
  • Private
May 19, 2013
3,508
4,835
483
Project One - The Tit Cracker. Part two.

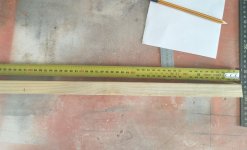
So on to some of the tools and techniques you will need for this and other projects. If you don't get your timber cut at the store you will need to saw the long stick of wood you buy into two short lengths. To do this you need to mark out the material first. For measuring a tape measure is the easiest and most adaptable but you can improvise with a ruler and that will still work. In this project the length isn't critical so getting this exact isn't that important but it's still a good way to learn the techniques needed.

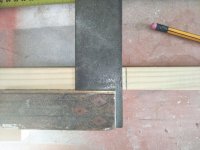
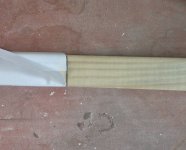
Use your tape to measure out 400mm and make a mark with a pencil, now you need to run that mark all the way around the 4 sides of the wood so you have a guide to cut it square. If you have a set square (as in the photo) use that but you can also get the same result with a sheet of paper. Line the edge of the paper on your mark and wrap it tightly around, when the wrapped edge is lined up with the starting edge you will know this is square all around. Now mark this line with your pencil and you can make your first cut.

marking out 1.jpg marking out 2.jpg marking out 3.jpg

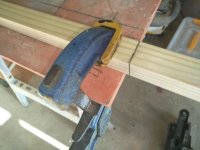
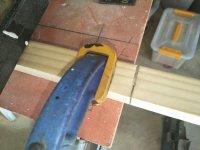
When sawing timber it is important to keep it still so you get a clean, straight cut. If you have a workbench you can use with a vice that great, or you can use a clamp if you don't have a vice.
If you don't have a vice or clamps you can improvise by using steps, placing the wood on a step and back against the next step up will keep it reasonably steady as you make your cut.
Begin the saw cut slowly with very little pressure, the blade will do the work. Guide it using your thumb knuckle held up away from the teeth to keep the blade in line and draw the saw towards you, make a few back draws like this so a small cut starts before you make a forward stroke. Now you can proceed using nice slow, long strokes check the lines back and front to make sure you are keeping straight. When you get to the bottom of the cut take it easy and support the waste off cut so it doesn't fall and split the face of the timber.

cutting 1.jpg cutting 2.jpg


Great! Now repeat marking out and cut the second bar.

In the next part, drilling the holes.
 
  • Like
Reactions: BamaSwitch

Doctor Pervert

Retired
  • Straight
  • Male
  • Private
May 19, 2013
3,508
4,835
483
Project One - The Tit Cracker. Part three.

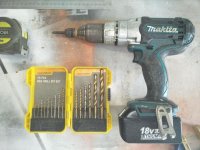
Moving right on to the drilling. If you don't have drill you will need one, a basic cordless is ideal and very cheap if you have to buy one. Even the cheapest you can find will do for the small amount of use it will get on these projects but if you are keen and want to do more DIY then spend a little more and get a name brand tool.
You will also need a set of common size drill bits, these are the part that does the actual cutting of the hole. Again for these project pretty much any cheap set of bits will do as you are mostly drilling wood only.

IMG20201216140908.jpg

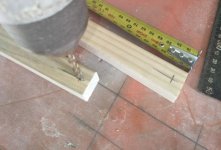
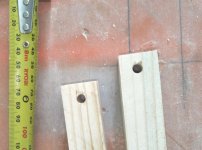
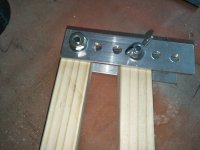
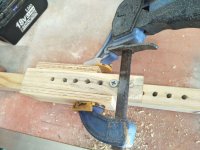
To drill the holes to attach the metal plates you will need a drill sized to matched the holes in your metal. If you bought the pre-made brackets then the easiest way is to test the various bits in the hole to find the best fit. This is then fitted to the drill to make the holes in the wood. If you are drilling both metal and wood then use a 6mm (1/4") bit on both. Mark the ends of both pieces of wood in the centre and 10mm from the ends as shown in the photo.

drilling 1.jpg

To drill the holes do not press too hard, as with sawing the drill will do the work, and make sure you keep the drill as upright as possible so the hole runs perpendicular to the faces and exits in the same position on the other side. If you've never used a drill before be sure to make lots of practice holes in some scrap wood first to get used to how it works and feels in your hands. Start slowly and increase the speed only as needed, slower speed will give you better control.

drilling 2.jpg

Alright, so I've covered a LOT in the last two installments and while the more experienced builder will have no problem so far if you're new to DIY you may have a lot of questions so now's the time if you want to ask anything.
 
  • Like
Reactions: BamaSwitch

Doctor Pervert

Retired
  • Straight
  • Male
  • Private
May 19, 2013
3,508
4,835
483
Project One - The Tit Cracker. Part four.

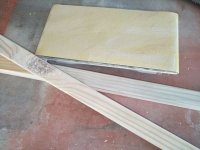
At this point the woodwork is almost done, just grab some sandpaper and give both parts a good sand to remove and sharp edges and splinters. A 120 grit sandpaper is ideal for this (unless your wood is very rough) and will leave a fine enough finish. A sanding block, as shown in the photo makes this process a lot easier but isn't essential.

sanding 1.jpg

Now we can move on to making the end plates, that's if you didn't buy predrilled plates in which case you can skip these steps.

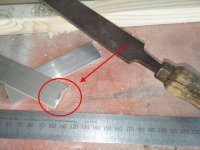
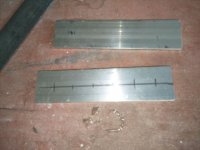
Cut your stock material to length and files the edges of all the cuts to make sure they are smooth. I used 25mm x 3mm (1" x 1/8") aluminium stock which can be purchased in short lengths at the hardware store. The keen eyed will notice the design used 20mm stock but as I had 25mm stock in the workshop I used that instead.

filing.jpg

Mark the drilling positions, make a centre line and then measure 12.5mm from one end, now mark the remaining points at 15mm intervals.

plates 1.jpg

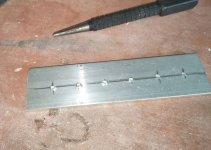
Use a centre punch if you have one to make for more precise drilling.

plates 2.jpg

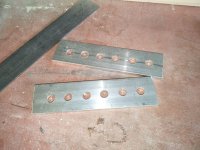
Drill the holes using a 6mm drill or to suite your bolt size.

plates 3.jpg

To make the holes match up exactly and save time you can clamp the two pieces together then drill through both in the same pass. If you do this you only need to mark out one plate. To remove burrs from the fresh holes use a much larger (10-12mm) drill bit and twists it a few times using only your fingers.


Ok so that's all the parts ready to go! The next and final part is the assembly.
 
  • Like
Reactions: BamaSwitch

Doctor Pervert

Retired
  • Straight
  • Male
  • Private
May 19, 2013
3,508
4,835
483
Project One - The Tit Cracker. Part five.

So now you should have all your parts made and ready to assemble.

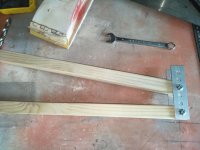
assembly 1.jpg

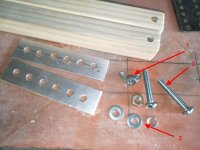
You will have the two wooden bars, two metal plates and you will also need two suitably sized bolts. I found some 38mm (1-1/2") long 6mm bolts, shown in the photo as 2. I also found a wingnut, shown as 1, these are perfect for this kind of toy as it makes adjustment easy and doesn't require any tools. I also used some washers to complete the build, these aren't essential but will stop the nuts biting into to the aluminium when tightening them.

assembly 2.jpg

I used a plain nut for the bottom rail and tightened it up so the plates are held perpendicular to the bars. I then inserted the top bar and used the wingnut to secure its bolt in place. This should be just tight enough so it doesn't come off but loose enough so the top bar can pivot open and closed on this bolt.

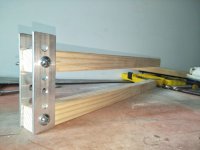
finished 1.jpg

And there it is, the finished Tit Cracker!

tit cracker.jpg tit cracker dimensions.jpg

Here's another view that I rotated to put it roughly the same view as the original design. So now everything should make sense, and you can see how it works.
The top bar is adjustable from a very narrow opening to quite wide, you can also see how the top bar pivots up and down allowing you to place a boob inside and then squash it between the bars. For simplicity I didn't add any lock or latch to hold it closed. You can use rubber bands or some cord but I find the ideal item is some Velcro tape.
This quite a versatile toy, you can use it on one tit at a time or both together. It can be held closed manually or held shut as described. Due to its compact shape you can use it vertically on one tit and even use it to do some heavy duty titty twisting!

If you've read all the way through and are keen to give it a go, here is the list of materials and tools you'll need. As mentioned at the outset you can use whatever you can find that is close to the right dimensions so use the list as a guide. If you are unsure just pop a message here with your question, if you've found something and are wondering if it work post a photo and I'll let you know.

Material list:
  • 25mm x 25mm (1") by 800mm (32") long, softwood such as pine. Most hardware will sell 1m (3') lengths.
  • 20mm x 3mm (3/4" x 1/8") by 200mm (8") long aluminium plate OR 2 predrilled metal plates of suitable size
  • 2 bolts 6mm x 38mm (1/4" x 1-1/2") with nut and wingnut plus washers (or to suit predilled plates)
Tools list, essential:
  • Drill + drill bit to suit holes required
  • Tape measure or ruler
  • Sandpaper
  • Pliers or shifting spanner or similar to tighten bolts
Tools list, optional:
  • Wood saw
  • Hacksaw
  • Metal file
  • Centre punch
  • Set square
  • Clamp or vice

Ok so time get to busy!
 
Last edited:
  • Like
Reactions: BamaSwitch

Magnetic

Distinguished Member
  • Straight
  • Male
  • Dominant
Jul 19, 2016
330
103
28
Thanks, @droptokon, many people here will find these instructions quite clear, useful, and to the point.
I have a question, and then a comment.

Do you think that the tit cracker also double as a clit cracker? Maybe not, but I know that it would only be a matter of scaling it down.

The holes in the metals bars... They correspond exactly to a industry standard hole size called "M6" for bolts, screws, nuts, metallic patches and the like. So, this step can be replaced by simply: "Get 2 M6 aluminum patches from the hardware store".
 

Doctor Pervert

Retired
  • Straight
  • Male
  • Private
May 19, 2013
3,508
4,835
483
The holes in the metals bars... They correspond exactly to a industry standard hole size called "M6" for bolts, screws, nuts, metallic patches and the like. So, this step can be replaced by simply: "Get 2 M6 aluminum patches from the hardware store".
Yes, they are M6. And yes indeed getting predrilled M6 patches, sometimes also called mending strips is ideal. However these are not always available everywhere which is why I included a number of options and methods for these.

You could also scale down for other uses yes, one small enough to use on a clit would be fiddly to build but not impossible.
 
Last edited:

Magnetic

Distinguished Member
  • Straight
  • Male
  • Dominant
Jul 19, 2016
330
103
28
One more question, why using 2 mending strips? Why not 4? 2 at each side...
 

Doctor Pervert

Retired
  • Straight
  • Male
  • Private
May 19, 2013
3,508
4,835
483
One more question, why using 2 mending strips? Why not 4? 2 at each side...
Sure you can do that, in this case I was presenting the most basic version mainly as a demonstration of the steps involved to give those not familiar with building an easy to follow model.

I am actually planning on a few future posts to add extra functions to this device and a closer on the open end is one of those things.
 

Magnetic

Distinguished Member
  • Straight
  • Male
  • Dominant
Jul 19, 2016
330
103
28
Sure you can do that, in this case I was presenting the most basic version mainly as a demonstration of the steps involved to give those not familiar with building an easy to follow model.

I am actually planning on a few future posts to add extra functions to this device and a closer on the open end is one of those things.
Keep them coming... Thanks!
 
  • Like
Reactions: Doctor Pervert

Doctor Pervert

Retired
  • Straight
  • Male
  • Private
May 19, 2013
3,508
4,835
483
Alrighty then, now we can move on to the first of a few modifications to the Tit Cracker. These are of course optional but will make for a more interesting and versatile toy.
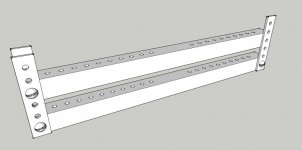
So we go back to the design views again, this is what the this first set of mods look like.

tit cracker mod 1.jpg

As you can see, this adds a single upright plate to the end for use in locking the top bar in place once it is clamped. It uses exactly the same plate layout as the first two, its just a copy. Only one is required to keep it secure but if you wanted the symmetry of a back plate you can add that yourself. This extra plate is bolted tight at the bottom and you can use another bolt or plain 6mm pin to secure the top rail in the required place.
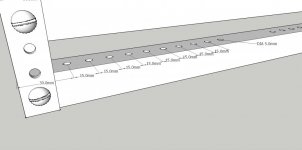
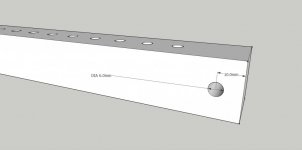
You will also notice a lot of extra holes have been drilled in the main rails, two sets of 10 in each. These are 5mm holes spaced 15mm apart and will be used later for the attachment of extras.

Here are the details of the extra holes that need to be drilled, you will need to disassemble your device so the sections can be supported firmly for drilling. In the next installment I will include photos and tips on easy ways to make the extra holes and keep then nice and even.

tit cracker mod 1 details 2.jpg

tit cracker mod 1 details.jpg

For details on the end locking plate just refer back to the instructions for the original parts. If you used a predrilled part from the hardware then you will need another to match.

I received a question about what to finish the wood with so here are my recommendations. You can simply paint them, that will require a timber primer first to prevent the wood soaking up the paint. If you prime them with two coats and sand until smooth you can spray paint them any color you like. If you use spray paint you can also paint the aluminium plates but be aware this will likely chip with use so may not be ideal.
You could also seal with a clear coat such as polyurethane but my favorite for this type of toy is to use a high quality furniture wax. Make sure you sand the timber to a fine finish first then apply several coats allowing a few hours between coats.


Next up, step by step on making the modifications.
 

Doctor Pervert

Retired
  • Straight
  • Male
  • Private
May 19, 2013
3,508
4,835
483
This installment is going to all about jigs, what they are and how they can save you time and effort in your builds.
The modifications call for 20 holes to be drilled in each bar, 40 in total, thats a lot of holes. Luckily they are all the same size and spacing which is ideal for a jig. A jig is basically anything you can use to guide a building step and reuse it several times to get the same result each time. Mass production often uses jigs for manufacturing parts as well as assembling them. I will show you a great quick way, using a jig to drill all 40 holes.
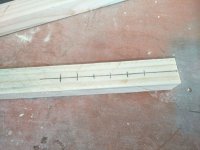
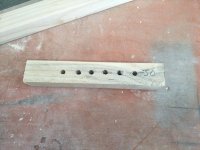
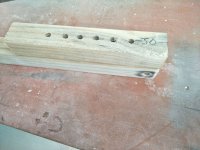
As there are 2 sets of 10 holes in each bar the simplest method to drill these all the same is to make a jig, and for our purposes a short length of the same wood used for the bars is perfect. Mark out the first hole which is 30mm from the ends, then 5 more at 15mm intervals. Why 6 holes and not 10? That will become obvious a bit later.

jig 1.jpg

Now drill these 6 holes as neat and straight as you can, this isn't critical as they don't have to align with anything specific.

jig 2.jpg

If you mark the 30mm offset end it makes alignment easier so you don't get mixed up. Place the 30mm marked end at one end of a bar, be sure you are on the perpendicular face to the one with the pivot hole.

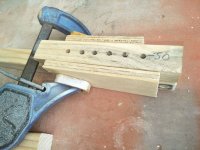
jig 3.jpg

Clamp your jig in place using a couple of scraps of wood to make sure the jig is aligned with the bar exactly and held steady.

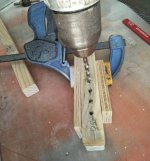
jig 4.jpg

Now you can begin drilling the holes using your jig as a guide for each hole. Notice the jig helps to keep the drill holes straight making this much easier.

jig 5.jpg

When you have drilled the first 6 holes move the jig along the bar and use a close fitting screw in the last hole to drop into the 6th hole you have already drilled. This keeps the spacing correct for the remaining 4 holes you need to drill. Be careful here as there are 5 holes remaining but only the first 4 need to be drilled.

jig 6.jpg

When you have this set of 10 holes finished move the jig around to the opposite end making sure to use the 30mm offset on the end and repeat the process. Then repeat the whole thing over on the second bar.

That's it! lot of drilling, 40 neat(ish) holes drilled in your bars ready for their mystery use. Now its time to add the latch to the open end.
 

Featured Threads

New Personals